Skip to content
Instructions for creating your living roof:
Step 1:
Place the waterproofing material inside the roof floor of the birdhouse. - This will probably already be in place. I add this layer of protection mostly to prevent any chance of water entering the nesting area.
Step 2:
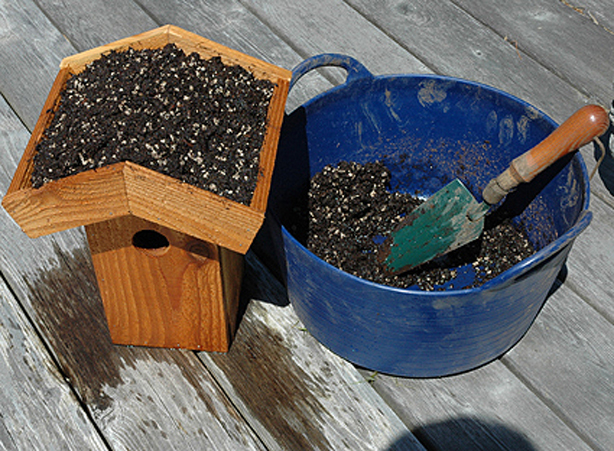
Add a generous amount of high quality moist potting soil. I put the soil layer almost level with the edge of the roof frame. - Do not use garden soil. - You want a good foundation for your living roof - adequate drainage and free of weed seeds, bacteria and fungi.
Step 3:
Let the sphagnum moss soak in a tub of water for about 30 minutes. The moss not only holds the soil in place, but retains a large amount of moisture (up to 10 times its weight). It also decomposes slowly - which means it won't need to be replaced for years. Once the moss is thoroughly soaked, squeeze out as much water as possible and add a layer to the roof - on top of the soil.
Step 4:
Position the chicken wire evenly over the roof frame. Starting on one side - staple the wire in place. Then go to the opposite side and pull the wire tightly over the roof and moss and secure the wire into the wood frame with the stapler. Do the front and back of the birdhouse last. Trim off the excess and fold the edges of the wire back into the roof frame.
Step 5:
Tuck additional moss into the open spots and edges of the roof frame.
Step 6:
Add the plants. - A dandelion weeder can be used to make holes (between the chicken wire holes) in the moss down into the soil. Try to preserve as much as the root system as possible and then tuck more moss around the plant to secure it in place. One of the benefits of using sedums is that they re-root easily. They might look a little wilted for a week or so, but then perk up and thrive in about any growing condition.
- Water the roof and plants every few days while the roots are getting established. - I just put the garden hose on a sprinkling mode and soak the roof...
- Of course if a family moves into the birdhouse - try not to disturb them until the young birds leave the nest.

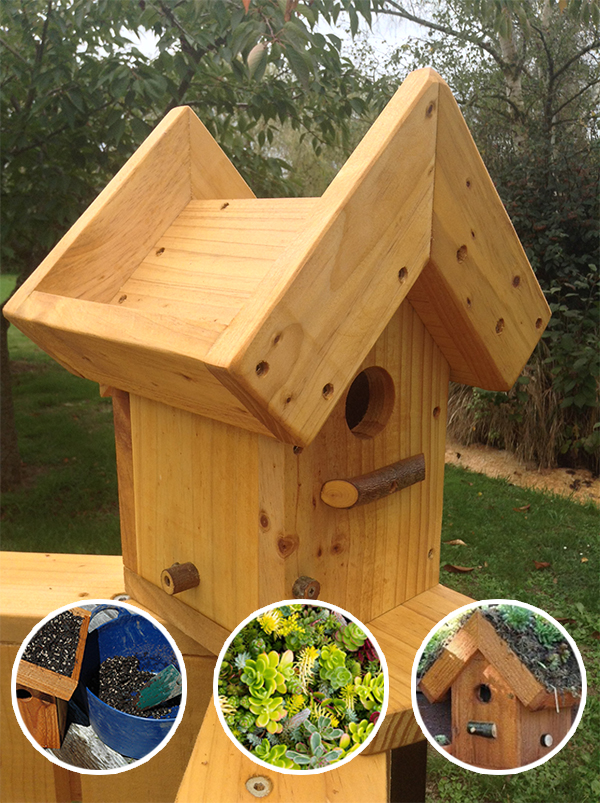
 The Living Roof Bird House:
The actual birdhouse -constructed of locally sourced NZ Timber with a removable lower front section for nest removal. There are side vents for air flow and drainage holes in the base floor of the birdhouse. The bird house is preserved and finished on the exterior using water based stain, providing high level of UV protection and advanced weather resistance as well as mold and fungus resisting properties. The interior of all creative woodcraft’s bird habitats remain natural and unfinished creating a natural environment for its inhabitants. The entrance hole size is 48mm - suitable for sparrows and other garden birds.
Materials you will need:
The Living Roof Bird House:
The actual birdhouse -constructed of locally sourced NZ Timber with a removable lower front section for nest removal. There are side vents for air flow and drainage holes in the base floor of the birdhouse. The bird house is preserved and finished on the exterior using water based stain, providing high level of UV protection and advanced weather resistance as well as mold and fungus resisting properties. The interior of all creative woodcraft’s bird habitats remain natural and unfinished creating a natural environment for its inhabitants. The entrance hole size is 48mm - suitable for sparrows and other garden birds.
Materials you will need:
- Waterproofing material to place over the frame of the roof.
- A medium bag of sphagnum moss.
- Chicken wire - to secure the soil and moss to the roof frame.
- A high quality potting soil/compost.
Tools you will need:
- Staple gun - to secure the chicken wire to the roof frame.
- Garden tool for adding plants. - I use a dandelion weeder, but actually a butter knife would work...
Suggested Plants:
Use winter hardy sedums and succulents in the living roof. Creative Woodcrafts top sedum choices are:
Sedum kamtschaticum ‘Orange Stonecrop’
Sedum sarmentosum ‘Graveyard Moss’
Sedum reflexum ‘Blue Spruce’
Sedum rupestre ‘Angelina’
Sedum spurium ‘John Creech’
Sedum kamtschaticum ‘Weihenstephaner Gold’
Sedum album var. ‘Coral Carpet’
Sedum spurium ‘Fuldaglut’-‘Voodoo’-‘Dragon’s Blood’
Sedum hispanium ‘Blue Carpet’
Sedum acre ‘Aureum’-‘Miniature Stonecrop’
Sedum spurium ‘Tricolor’

 The Living Roof Bird House:
The actual birdhouse -constructed of locally sourced NZ Timber with a removable lower front section for nest removal. There are side vents for air flow and drainage holes in the base floor of the birdhouse. The bird house is preserved and finished on the exterior using water based stain, providing high level of UV protection and advanced weather resistance as well as mold and fungus resisting properties. The interior of all creative woodcraft’s bird habitats remain natural and unfinished creating a natural environment for its inhabitants. The entrance hole size is 48mm - suitable for sparrows and other garden birds.
Materials you will need:
The Living Roof Bird House:
The actual birdhouse -constructed of locally sourced NZ Timber with a removable lower front section for nest removal. There are side vents for air flow and drainage holes in the base floor of the birdhouse. The bird house is preserved and finished on the exterior using water based stain, providing high level of UV protection and advanced weather resistance as well as mold and fungus resisting properties. The interior of all creative woodcraft’s bird habitats remain natural and unfinished creating a natural environment for its inhabitants. The entrance hole size is 48mm - suitable for sparrows and other garden birds.
Materials you will need: